


Email Marketing
What makes a good subject line?
Subject lines are an important part of your email, so here's how to not mess them up.
Read More →
What can you do when you don't love the look of your webinar tool's automated emails? Here's a step-by-step guide on how to build your own.
Webinars are a powerful way to engage with your audience—whether you're showcasing your product or are looking to teach best practices. Especially now when many brands had to cancel their in-person events, more and more marketers are adopting webinar formats to connect with their audience live.
When you look at the design and branding efforts teams invest into their webinars and the promotions that come with it, it becomes clear just how much brands bet on the power of webinars in their marketing mix. You'll see beautifully designed slides and landing pages, gorgeous email promotions, ads, and social imagery. But even the most professional webinar programs often have one element that doesn't fit into the branded webinar experience: The webinar confirmation and reminder emails.
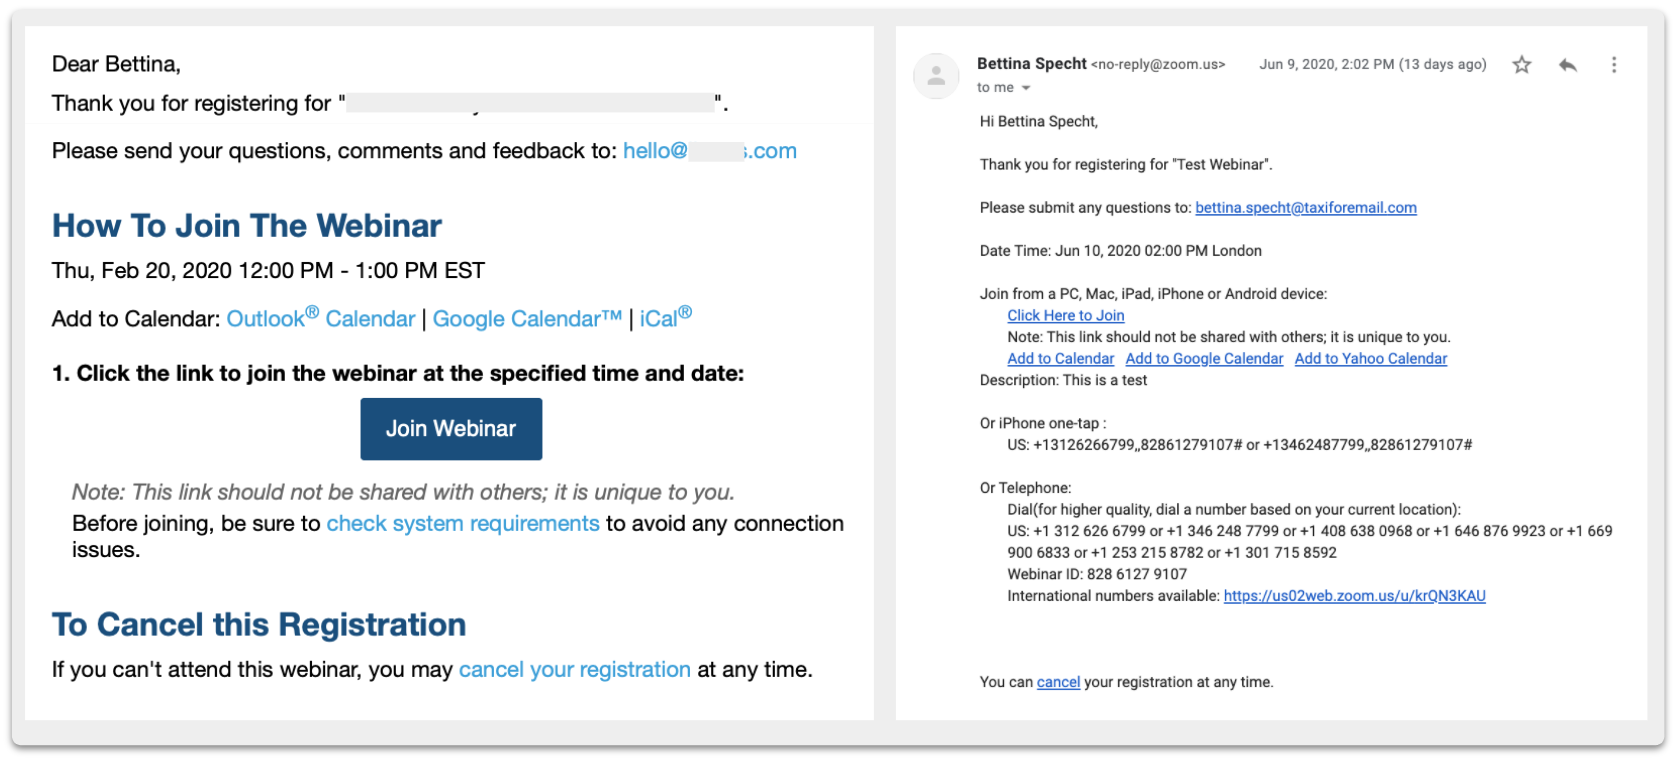 Two examples of standard confirmation emails from two popular webinar tools
While marketers have full control over all other webinar elements, these types of automated emails are sent from within the webinar tool—the examples above show emails from GoToWebinar and Zoom—giving marketers no options to customize the designs. If you're both a branding nerd and an email geek, you'll agree that this isn't ideal.
Here's the thing though: You don't have to accept that webinar emails look off-brand.
In this guide, we walk you through how we automatically pull out registration info from our webinar tool and set up triggered emails that are fully customizable—and on-brand.
So you don't love the emails sent by your webinar tool and as a savvy email geek you're looking at ways to fix that. Well, you could just disable the confirmation email in your webinar tool, drop registrants into your email service provider (ESP), and send the confirmation email from there, couldn't you? That would be easy if there wouldn't be one factor throwing a wrench into your plans: The unique join links.
Each webinar registrant, once signed up for a webinar, gets assigned a unique webinar join link. Just sending a one-size-fits-all confirmation email to every registrant thus doesn't work. You'll have to figure out how to pull the custom join link for each registrant out of your webinar tool and into your email. What sounded like a simple idea suddenly got a whole lot more complex. That's where most marketers abandon the idea of a beautiful, branded webinar confirmation email, go back to enabling the automated emails in their webinar tools, and just accept that those look, well, less than ideal.
Sounds familiar? Here's the good news. Sending branded webinar confirmation and reminder emails is possible—all you need is Zapier and a little bit of time for a one-time setup that you can re-use every time you run a webinar.
Ready to say goodbye to those ugly webinar confirmation emails? Here's a step-by-step guide on how we did this here at Taxi.
There's a whole range of tools you can use to collect webinar registrations, run your webinars, and of course send your emails. In this guide, we're walking trough how to set up the automation using the following tools:
And most importantly to make the magic happen:
If you're unfamiliar with Zapier, I encourage you to go check it out. Picture Zapier as your magic plumbing that helps you connect your tools and pipes data from one tool to the other, giving you the power to combine your separated tools into an integrated marketing powerhouse.
You're using a different webinar platform, form collector, or email service provider? As long as they're supported in Zapier, you can use the same logic to plug them all together. Here's how.
Let's get started with the basics. If someone registers for a webinar, you'll want to make sure their information makes it into Zoom (or your webinar tool of choice) and you're also collecting that info in your ESP. Set up your webinar in your webinar software, and decide how you'd like to identify webinar registrants in your ESP. In our case, we set up a new list for our upcoming webinar in Campaign Monitor—and we want all registrants to get added to that list.
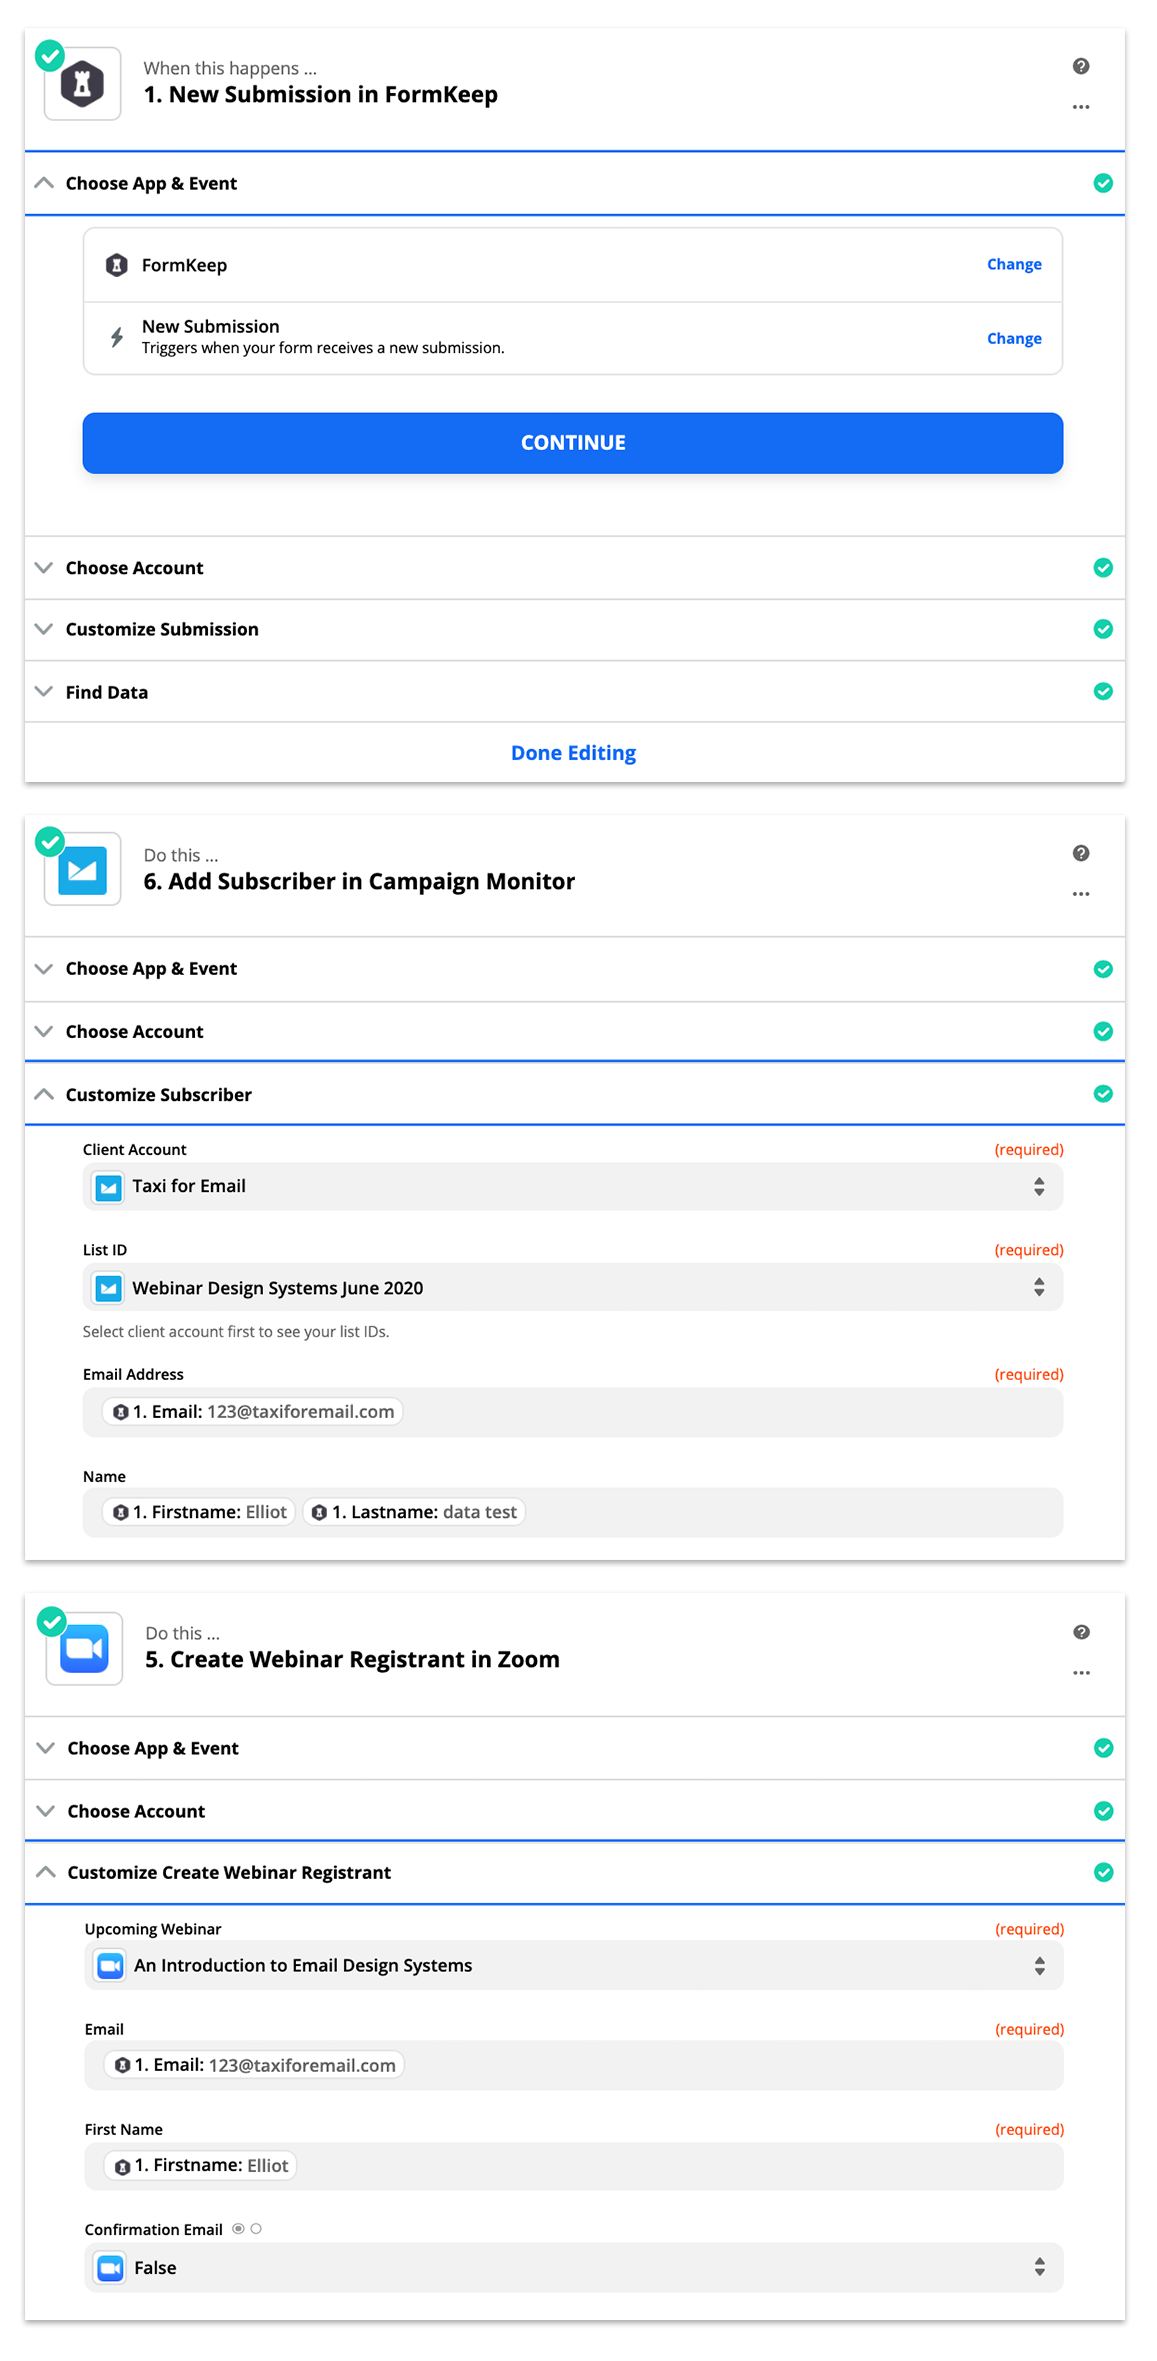
We're using FormKeep to power the registration form on our website and then use Zapier to push the information that's collected via the form into both Zoom and Campaign Monitor. That looks like this:
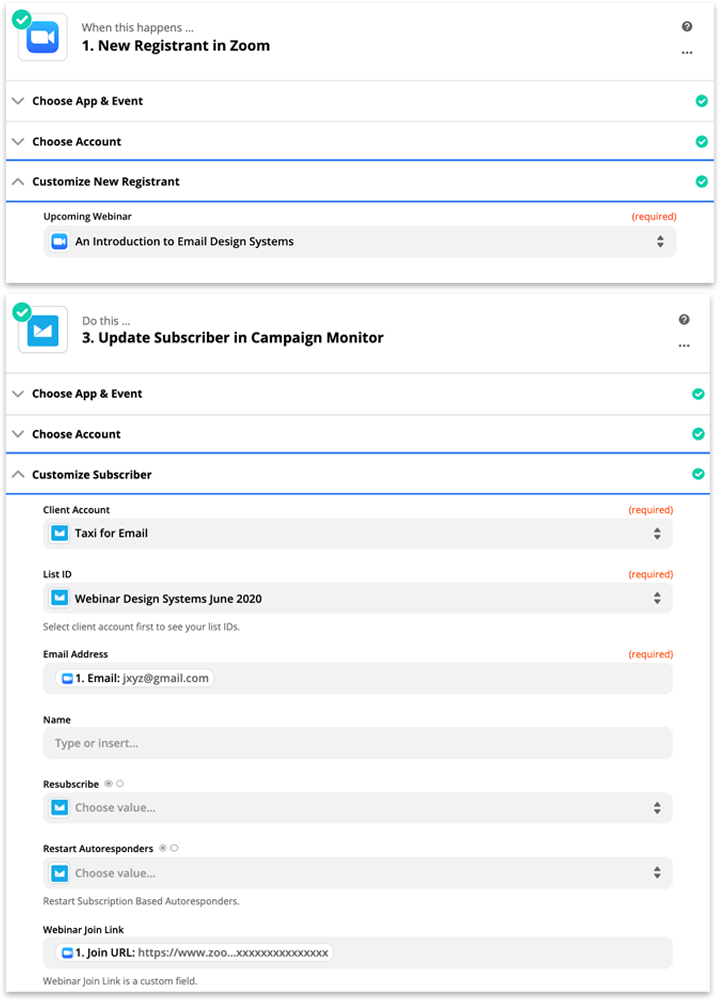
Now, we've got our registrants in Zoom and in a webinar list in our ESP. We can't send that confirmation email just yet though because there's one crucial bit missing: The custom join link—and that one gets created in Zoom after a registrant is added to the system. Let's pull those custom links out of Zoom and update our registrant records in our ESP.
To do that, we set up a new custom field [Webinar Join Link] in Campaign Monitor, and then use another Zap to populate that field with the info from Zoom. That's as easy as this:
This is where the fun part starts! You can now build your registration confirmation email as well as any reminders you might want to send using your own branded emails.
You'd like to add headshots of your speakers to give the confirmation email a more human touch? Are you looking to include a way for registrants to submit questions ahead of time? Or would you like to provide some related resources to help your audience start learning before the session starts? Whatever you have in mind to provide the best possible experience, you now have full flexibility on the look and content of your emails.
Our webinar confirmation, for example, looks like this:
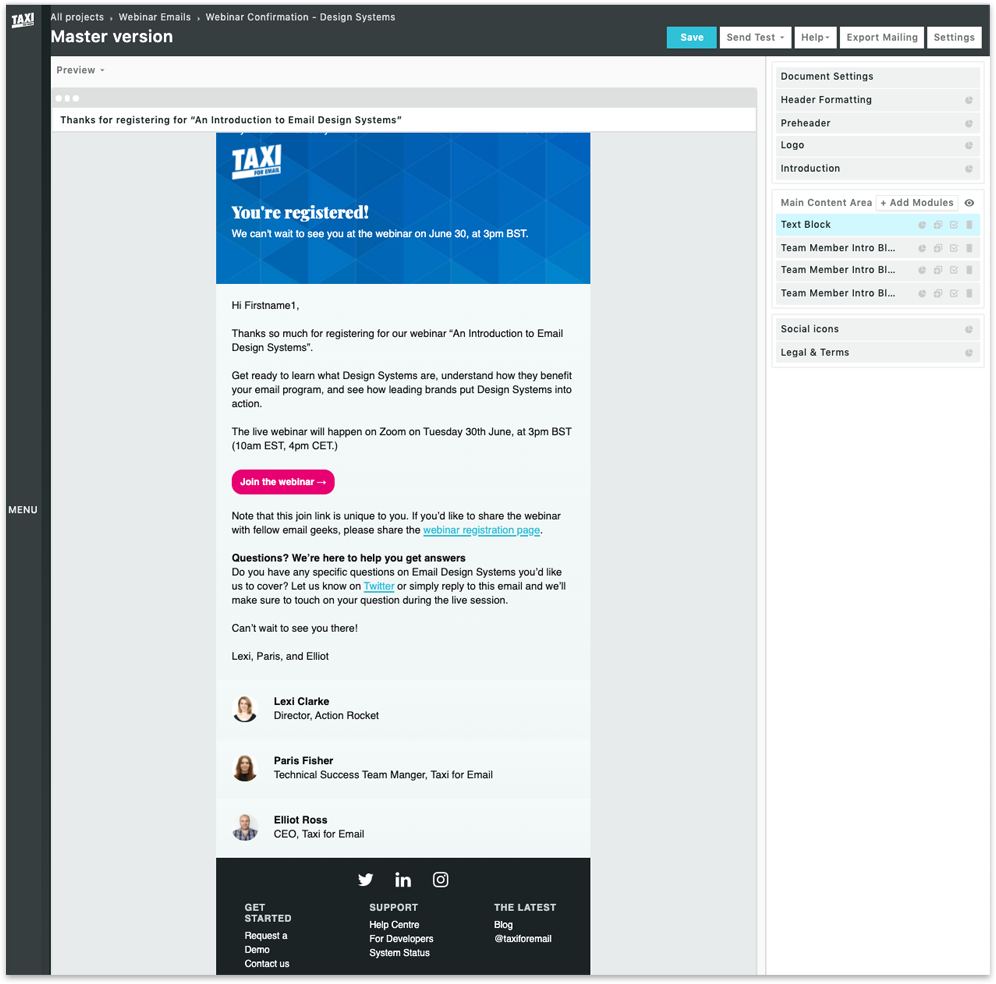 Here's how our webinar confirmation looks like in Taxi
You'll have to reference that custom field that you set up in your ESP when you include your join link. In our email, for example, the registrant's join link is hiding behind our pink CTA, and we're using Taxi's dynamic content feature to pull in the unique link.
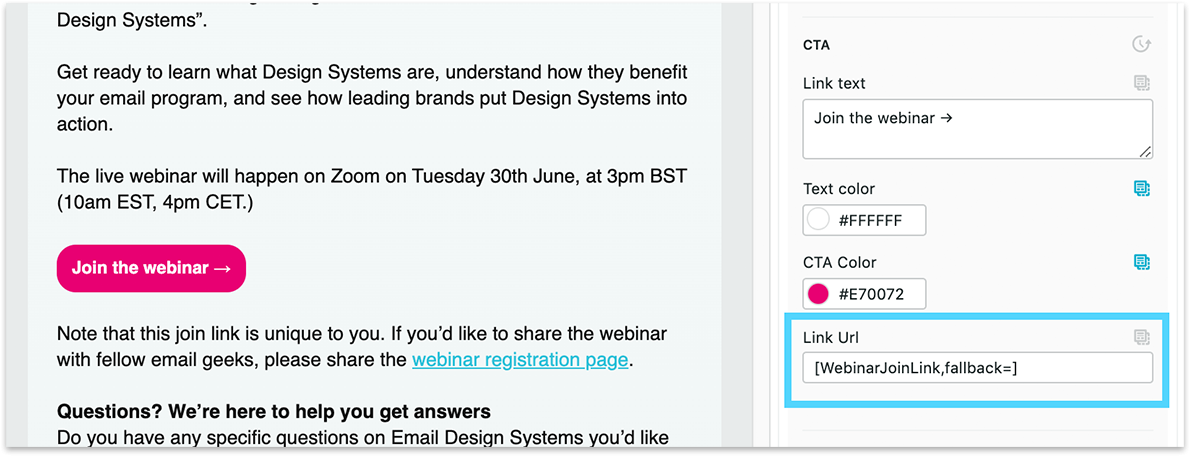 To add dynamic content on your CTA in Taxi, drop the personalisation tag into the Link URL field.
Happy with your email? Now, let's make sure your registrants receive it!
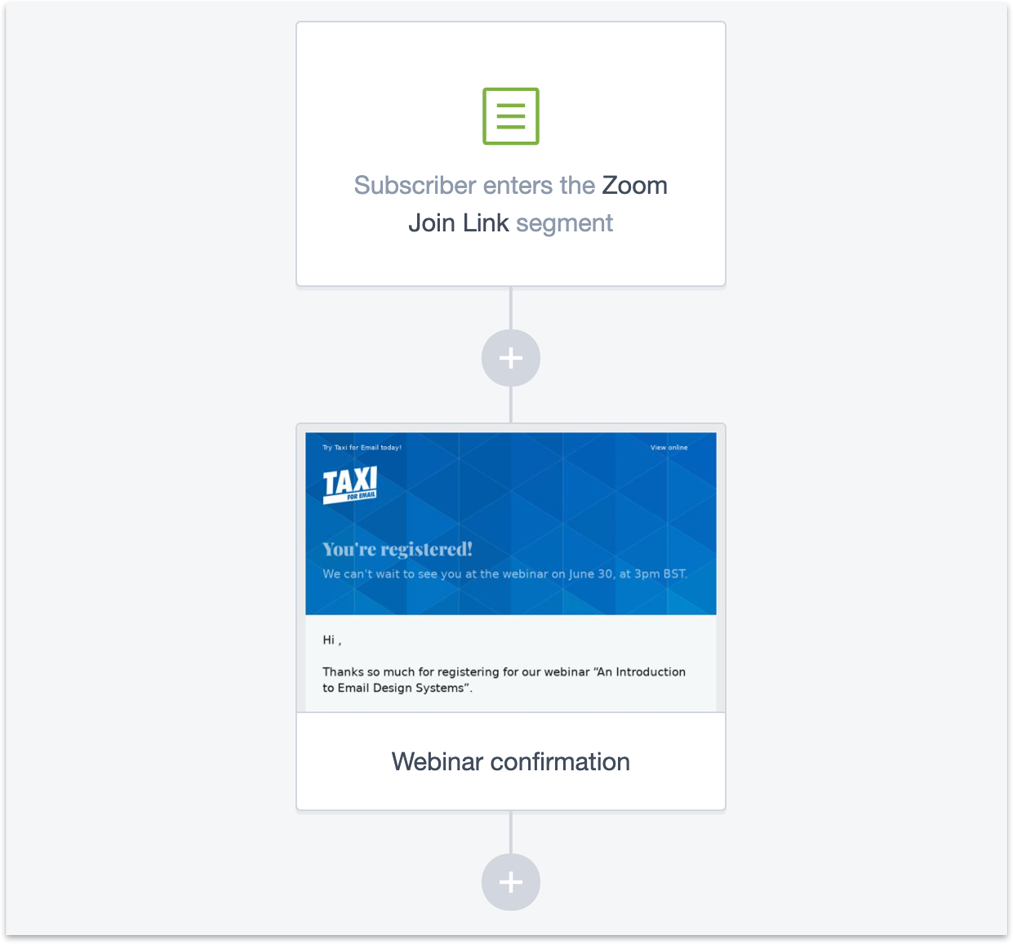
Remember that you'll only want to send out your confirmation email once the registrant in your ESP has the join URL populated? That's why we use that very event as a trigger for our email send.
In Campaign Monitor, we set up an automation rule that adds a registrant to a new segment as soon as the join URL field is populated—and then our webinar confirmation email is automatically sent to everyone who enters the segment.
Are all the pieces in place and your Zaps switched on? It's time to test your work to ensure your emails get triggered and the information flows seamlessly between your tools. You'll want to give special attention to the custom join link—the last thing you want is having people register and then not being able to join on the day of the session because of a faulty link.
When you submit a test registration and receive your branded registration confirmation, double-check that it matches the join link in your webinar tool. If you're using Zoom to run your webinars, you can manually trigger one of Zoom's confirmation emails when you navigate to the registrant details for your test submission.
 Here's how you trigger the confirmation email in Zoom
Check if the join link in your webinar tool's email matches the one in your branded version. If it does, you're good to go!
It's right, there are a few moving pieces and tools involved to allow your team to send custom webinar emails. Keep in mind though that setting this up once is the hardest part. Once you have your process in place, setting custom emails for another webinar is mostly a matter of duplicating your Zaps and making small tweaks to ensure your automations are picking up the new webinar, and a new list in your ESP.
Are you only running webinars occasionally or are you just getting started using the webinar channel for your brand? In this case, setting up custom webinar emails might not be a priority for your team.
But if you heavily rely on webinars to connect with your audience, run sessions frequently, and aim for a consistently great brand experience throughout every customer touchpoint, setting up on-brand webinar emails is likely worth your time.
What's your thoughts? Have you been struggling with setting up custom webinar emails? What brands are sending beautiful, on brand webinar emails? We'd love to hear from you. Shoot us a note on Twitter.
Taxi helps marketing teams make better quality email, quicker, at a larger scale.

